Saturday, January 10, 2015

Green Tea Strawberry Coconut Cupcakes

I've been testing out flavor combinations lately—in preparation for the not-so-soon grand opening of my cupcake bakery. It'll happen one day. But for now, I'll just concentrate on creating and perfecting out-of-this-world cupcakes. 


My latest flavor test were these green tea strawberry coconut cupcakes...what a mouthful. They components are green tea cake, strawberry jam filling, strawberry swiss meringue, and a toasted coconut rim. In all honesty....these cupcakes are AMAZING! The cake isn't very sweet and the earthy flavor of matcha really shines through even with the tartness and sweetness of the strawberry swiss meringue. 

I contemplated for a while what kind of buttercream I wanted to use for these cakes. At first, I was going to just go for a simple American buttercream. However, I realized that it would be too dense and way too sweet for the matcha. I also thought of a french buttercream, but thought that it would be too rich and buttery. My final decision was a swiss meringue because of it's lightness and smooth texture. Swiss meringue buttercream also isn't very sweet and allows other flavors to shine through. 


Recipe Review:

Taste: I used two tablespoons of matcha, so the flavor really comes through, even with all the other components. The buttercream has a very nice strawberry flavor and isn't too sweet. 
Texture: The toasted coconut rim makes all the difference. It adds a wonderful crunch and is slightly smoky. The cake itself is very moist and fluffy. The buttercream melts in your mouth and is so light and airy. 
Appearance: See for yourself! Aren't these cupcakes just the cutest? I love the contrast of the light pink against the earthy green. These cupcakes kind of remind me of bird's nests. 
Level of difficulty: This is a fairly simple recipe. As with all my recipes that include swiss meringue, the only "difficult" part would be the time it takes to make the buttercream. 


Green Tea Cupcakes
Adapted from Billy's Bakery & Martha Stewart
makes 12 cupcakes 

ingredients:
3/4 cup sugar 
1 stick unsalted butter 
2 large eggs 
1/2 teaspoon vanilla extract 
1 1/2 cup cake flour 
1 1/2 teaspoons baking powder 
1/2 teaspoons salt 
2 tablespoon matcha powder 
1/2 cup whole milk 
------------------------------------------------------------------------------------------
directions:
Line a cupcake tin with cupcake liners. Preheat the oven to 325°F.

In the bowl of a stand mixer, fitted with the paddle attachment, beat the butter and sugar until pale and creamy, about 5 minutes. Then add the eggs and vanilla and beat on medium-high speed, until it is well combined. 

In a small bowl, sift the flour, baking powder, salt, and matcha powder. Alternate adding the flour mixture with the milk, beginning and ending with the flour. Mix until all the ingredients are combined. Be sure not to overmix!

Fill the liners until 2/3 full. Bake the cakes for 17-20 minutes, or until a toothpick comes out clean when inserted. Make sure to rotate the pan halfway through the baking process to ensure even cakes. 


Toasted Coconut 

1 cup sweetened shredded coconut
------------------------------------------------------------------------------------------
directions:
Toast the coconut for 15 minutes, or until golden brown, while the cupcakes are baking. 

Once cooled, break up the coconut using your hands. You want the pieces to be small.


Strawberry Swiss Meringue
makes enough to frost 12 cupcakes

ingredients:
3 egg whites
3/4 cup sugar
2 sticks + 6 tablespoons butter, softened
1 teaspoon vanilla extract
1/3 cup strained strawberry preserves
------------------------------------------------------------------------------------------
directions:

Slightly whisk the egg whites and sugar in a small bowl and place it over simmering water. Make sure the bowl does not touch the water. Heat mixture to 160°F, whisking constantly.

Transfer the mixture to the bowl of a stand mixer fitted with a whisk attachment and beat on medium high speed until the mixture doubles in volume and forms stiff peaks. This will take about 10-12 minutes.

Once the mixture has doubled in volume and is cooled down, slowly add the butter in one piece at a time, mixing to incorporate after each addition. At first, the mixture will look curdled. Don't worry, this is normal. Just keep mixing and it will become smooth and creamy. Once it has all come together, add in the vanilla extract and strawberry preserves. Mix until fully incorporated. 


Assembly:
Hollow out the cupcakes using an apple corer or knife. (Or any tool you prefer.) Add about 1 ½ tsp of strawberry preserves into the center. Pipe the buttercream onto the cupcake. I like to use an Ateco#827 tip. Put enough coconut to fill the cup of your palm and cover the outside of the buttercream. Let the excess fall off. 


These cupcakes are so delicious that my mom, who isn't even a big fan of sweets, couldn't resist inhaling an entire cupcake after dinner. She was instantly hooked. Like I said, the cake isn't very sweet and pairs wonderfully with the slightly sweeter strawberry buttercream. The toasted coconut ties the entire cake together. It's the perfect cupcake! The addition of the heart sprinkles makes it the perfect Valentine treat as well. So be sure to makes these for the special person(s) in your life :)

As always, happy baking! 
Thursday, October 23, 2014

Chocolate Pudding Cookies

No, sadly these aren't cookies stuffed with chocolate pudding. (That would be a fantastic idea though....) They are still absolutely phenomenal!!


These cookies are perfect for the secret, or not so secret, chocolate lover inside of you. There are three types of chocolate in these wonderfully fudgy cookies: cocoa powder, chocolate pudding mix, and a plethora of chocolate chips. It's chocolate madness!! 

If you're wondering if you can omit the chocolate pudding aspect of this recipe, the answer is NO! (Please excuse my rudeness.) The chocolate pudding mix is what makes these cookies so nice and fudgy. It keeps the cookies nice and soft as well. Brown sugar also helps make these cookies nice and chewy.

I have to say, I had some trouble trying to pry these cookies out of my greedy brother's hands. I think he might have eaten four or five cookies in one sitting. That's really saying something considering how rich and decadent these treats are. 

If there's one piece of advice I can give you regarding the consumption of these cookies, it's to eat them after having let them cool for a maximum of 10 minutes. That way they're still warm and the chocolate chips still ooze their way out of the cookie and onto your tastebuds. 

To. Die. For 


Recipe Review:

Taste: So much chocolate! Contrary to what you may believe, these cookies aren't that sweet. They have a deep chocolate taste from all the different types of chocolate added.
Texture: Very moist and and fudgy. It's a thicker cookie because it does not spread out much in the oven. 
Appearance: They have a beautifully rich brown color and once you break them open, you can see the lovely specks of chocolate. 
Level of Difficulty: It's an extremely simple dough to make. The "hardest" part, as with many of these recipes, is waiting for the cookies to cool. 


Chocolate Pudding Cookies
Adapted from Averie Cooks
makes 15-20 medium cookies

ingredients:
1 1/2 sticks unsalted butter
3/4 cup light brown sugar, packed
1/4 cup granulated sugar
2 large eggs
2 teaspoons vanilla extract
1 packet instant chocolate pudding mix, about 3.7 to 3.9 ounces (not sugar-free and not 'cook & serve')
1/4 cup unsweetened natural cocoa powder
2 cups all-purpose flour
1 teaspoon baking soda

1/4 teaspoon salt 
1 1/2 cup semi-sweet chocolate chips

------------------------------------------------------------------------------------------
directions:

In the bowl of a stand mixer fitted with the paddle attachment beat the butter, brown sugar, and granulated sugar until pale and creamy, about 2 minutes. Then add the egg and vanilla, and beat on medium-high speed until creamed and well combined. 

In a small bowl, sift the pudding mix and cocoa. Scrape down the sides of the mixing bowl, and add the pudding mix and cocoa and beat on low speed until just combined, about 1 minute.

In the same small bowl, sift the flour, baking soda, and salt and beat on low speed until just combined, about 1 minute. Next, add the chocolate chips and beat on low speed until combined, about 30 seconds. (If you find the chocolate chips are not incorporated well, mix them in with a spatula. 

Transfer the dough into a bowl that will fit in your refrigerator and refrigerate for at least 2 hours and up to 5 days. This is an important step! Without it your cookies will just flatten in the oven.

After the dough has chilled, preheat the oven to 350°F. Scoop the dough using a large cookie scoop, 1/4-cup measure, or your hands. Roll into balls, and flatten slightly. Place the dough mounds on baking sheet, spaced at least 2 inches apart (I bake 8 cookies per sheet) and bake for about 10 minutes, or until edges have set and tops are just set, even if slightly undercooked and glossy in the center. Don't over bake, which is easy to do with dark cookies. Allow cookies to cool on baking sheet for about 10 minutes before serving. 


These cookies will keep airtight at room temperature for up to 1 week but I really doubt they'll even last that long. Heck, who knows if they'll even last 1 hour....or even 10 minutes. If you're thinking of baking anytime soon, be sure to add this to your list. You won't regret it!

As always, happy baking!! 


Tuesday, August 5, 2014

Earl Grey Cupcakes

I’ve become quite the tea fanatic in the recent months. There’s nothing like a hot cup of earl grey or jasmine green tea to warm the body and the soul. (That sounded very spiritual.) Those two are my favorite teas as of now. There are still so many I have yet to try.


My brother actually introduced me to earl grey tea when I decided to make afternoon tea for my family almost a year ago. Ever since then, I haven’t been able to get it out of my head. Which is why I came up with the idea of making earl grey tea cupcakes. I mean, I love cupcakes and I love tea. It’s a match made in heaven.

I knew that I wanted to make an early grey cupcake, but I didn’t know what kind of frosting to pair it with. I had a swiss meringue buttercream in mind because it’s just light and fluffy enough to not overpower the mild earl grey flavor. Suddenly, I remembered having had the most amazing food experience at Le Cirque in Manhattan.


We were brought a complimentary earl grey panna cotta served in a caviar container. At first we were in complete shock, thinking we had just received an ENTIRE TIN of caviar. Then the waiter opened the lid and it still looked like we had received and ENTIRE TIN of caviar. However, he explained it was an earl grey panna cotta with tapioca “caviar”. We had a good laugh after being completely fooled. I tasted the product and it was good but it was definitely missing something. The waiter then put a nice dollop of lemon meringue on top of the panna cotta and the result was a flavor explosion that made more sense than I can even explain. The lemon meringue really enhanced everything and made the dish so extremely composed. 

That’s where my decision to pair the cupcake with a lemon swiss meringue stemmed from. The end result was a cupcake with a mild earl grey flavor. I was hoping for a bigger pop of earl grey after having steeped 4 tea bags for hours. However, there was enough to detect some earl grey in the cake. The lemon frosting was the icing on the cake. It added a refreshing burst of citrus to the earthy earl grey flavor. My mom liked it so much that she ate two within two minutes. I think this is definitely something I’ll have to make again.


Recipe Review:

Taste: There wasn’t as much early grey flavor as I would have liked. Next time I will either use more tea bags or steep them longer. The lemon buttercream was very bright and refreshing.
Texture: The cake is slightly dense but still very moist. The buttercream is light and very smooth. It practically melts in your mouth.
Appearance: There are tiny specks of early grey tealeaves all throughout the cake. It’s so pretty to look at, especially with the slightly purple tinted buttercream.
Level of Difficulty: This is a very simple recipe. It’s a standard vanilla cake. There’s just some waiting to be done with the steeping of the tea bags and the making of the buttercream. Other than that, it is very simple.


Earl Grey Cupcakes
makes 18 cupcakes 

ingredients:
1 3/4 cup flour
1 1/2 teaspoons baking powder
1/2 teaspoon salt
2 sticks unsalted butter, softened
1 1/2 cups sugar
3 eggs
1 teaspoon vanilla extract
3/4 cup whole milk
4 earl grey tea bags 
------------------------------------------------------------------------------------------
directions:


Line two cupcake tins with cupcake liners. Preheat the oven to 350°F.

Heat the whole milk in a saucepan until it simmers around the edges. Place the tea bags in the scalded milk. Steep in the fridge for 4 hours or preferably overnight. 

In a medium sized bowl, sift together flour, baking powder and salt. Set aside. 

In a the bowl of an electric mixer, cream butter and sugar until pale and creamy, about 5 minutes. Scrape down the sides of the bowl and add in the eggs one at a time. Add the vanilla extract. Beat until combined. Alternate adding the milk and flour mixture, starting and ending with the flour mixture. Mix until the ingredients are fully incorporated.

Fill the cupcake liners about ¾ full. Bake the cupcakes for 20-22 minutes, or until the top is golden brown. Let cool completely. 


Lemon Swiss Meringue 
makes approx. 3 cups a
adapted from Baker's Royale

ingredients:
5 egg whites
1 1/2 cups sugar
4 sticks unsalted butter, cold and cubed
1 teaspoon vanilla extract
1 tablespoon lemon zest 
------------------------------------------------------------------------------------------
directions:

Slightly whisk the  egg whites and sugar in a small bowl and place it over simmering water. Make sure the bowl does not touch the water. Heat mixture to 160 degree°F, whisking constantly.

Transfer the mixture to the bowl of a stand mixer fitted with a whisk attachment and beat on medium high speed until mixture doubles in volume and forms stiff peaks. This will take about 10-12 minutes.

Once the mixture has doubled in volume and is cooled down, slowly add the butter in one piece at a time, mixing to incorporate after each addition. At first, the mixture will look curdled. Don't worry, this is normal. Just keep mixing and it will become smooth and creamy. Once it has all come together, add in the vanilla extract and lemon zest. Mix until fully incorporated. 


Once you've made the cupcakes and the frosting you can frost and decorate however you wish. As usual, I use my favorite tip which is the Ateco#827. I added just a touch of purple gel food coloring to match the rest of the cupcake, but that's completely optional. 

These cupcakes are great for a tea party or a cute picnic. You can also make them just for the heck of it. They’ll go so quickly, so be sure to make enough for everyone!

As always, Happy Baking!! 

Sunday, July 20, 2014

Chocolate Ganache Cake

Do you ever have an intense craving?

You know, one of those cravings that don’t go away no matter how hard you try to resist.

I did.

This morning.

I had the deepest, most intense desire for a rich chocolate cake. At first I thought that I could just ignore it like I usually do. The next thing I knew, I was on Google searching for pictures of chocolate cake. I was torturing myself. I quickly closed my browser and tried to erase the images from my mind. In the blink of an eye, I was at the kitchen counter measuring flour and cocoa powder. I caved.


Truthfully, I have no regrets whatsoever for caving. The result of my cravings was quite possibly the most sinfully delicious cake I’ve ever made. The best part is that it was also the simplest cake I’ve ever made. It only consists of two things: chocolate cake and chocolate ganache.

I’m not a chocolate addict. Usually a fun size snickers bar is all it takes for me to not need chocolate for months. But there’s just something about this cake that is irresistible. Maybe it's the ridiculously moist chocolate cake. Maybe it’s the velvety smooth chocolate ganache. Whatever it is, I know that I don’t want it to ever leave. I want this chocolate cake in my life forever…till death do us part.


Recipe Review:

Taste: There is a deep chocolate flavor from the extra brute cocoa powder I use for the cake and the E. Guittard chocolate disks I use for the ganache.
Texture: So rich and moist. The cake has a nice crumb and the ganache is so smooth.
Appearance: I wanted the cake to look a bit more rustic so I left the exterior looking extra “homemade”. The inside has four lovely layers of cake and thin layers of chocolate ganache in between. It is sheer perfection.
Level of Difficulty: This cake is very simple to make. The ganache takes a few hours to cool, but assembly is a cinch. 


Chocolate Ganache

ingredients:
12 ounces (1 1/2 cups) heavy cream
24 ounces (3 cups) semi sweet chocolate (I used E. Guittard, 61% cacao) 
------------------------------------------------------------------------------------------
directions:

In a medium saucepan, heat the heavy cream until just simmering. Put the chocolate in a large bowl and pour in the heavy cream. Stir the mixture until the chocolate is evenly combined and there are no lumps. Cover the bowl with plastic wrap making sure that the surface of the mixture is covered and put in the refrigerator until it has cooled to a spreadable consistency. 


Chocolate Cake
yields 2, 8-inch cakes 

ingredients:
2 1/4 cup all-purpose flour 
2 cups sugar 
3/4 cup cocoa powder 
2 1/2 teaspoons baking soda
2 teaspoons baking powder 
1/2 teaspoon salt 
1 1/4 cups buttermilk, room temperature 
3/4 cup brewed coffee, lukewarm
2/3 cup vegetable oil 
3 eggs, room temperature 
1 teaspoon vanilla extract 
------------------------------------------------------------------------------------------
directions:


Preheat the oven to 350°F. Prepare 2, 8-inch baking pans with cooking spray and parchment paper. Set aside.

In a medium sized bowl sift the flour, sugar, cocoa powder, baking soda, baking powder and salt. Whisk to combine.

In a separate bowl, mix together the buttermilk, coffee, oil, eggs and vanilla. Combine the wet ingredients into the dry ingredients and mix until just combined. 

Once mixed, divide the batter evenly among the prepared baking pans. Bake for 20-25 minutes or until a toothpick comes out clean. Don't forget to rotate the pans halfway through the baking process to ensure an evenly baked cake. Cool completely. 


Assembly:

Once the cake layers have cooled completely, invert them onto a cutting board and peel off the parchment. Slice of the domed tops and then divide each layer in half, leaving you with 4 thin layers. 

Place the first layer of cake on a cake board and spread a thin layer of ganache on top. Repeat with the next two layers. Once you've done that, place the last cake layer on top and spread the rest of the ganache all over the cake. Voilà!


I highly recommend you make this if you’re a chocolate addict. You will never get tired of it. If you aren’t a chocolate addict, this cake will definitely make you one. Just be sure to never share. Just this once, be gluttonous.

As always,

Happy Baking!

Sunday, July 6, 2014

Apple Walnut Scones

I want to open a bakery.

I've wanted to open a bakery ever since I was ten years old. Now that I'm twenty, it seems that the desire to open one is getting stronger every day. That means it's time to start making and perfecting recipes that I can use in the future. 


I’m not sure why, but when I think about baked goods and breakfast at a bakery scones pop into my head. For some reason, I think of scones as the quintessential breakfast pastry. They seem very timeless to me. What’s great about them is that you have the base recipe and with that you can transform simple dough into something amazing. That’s what I did with this scone recipe. I simply took a base recipe and added my own spin to it. Although it isn’t currently apple season, I had a hankering for apples, despite my unfortunate allergy towards them.  

It wasn’t until recently that I developed an appreciation for baked apples. I used to find them unappetizing, as they lost their sweetness and became very tart and hard to stomach. However, I could have just had some bad apple pie back in the day. It wasn’t until I made Tyler Florence’s “Ultimate Apple Pie”, that I decided apple pie is freaking awesome.


Fortunately, I had some apples on hand that were waiting to be baked into buttery and flaky scones.  So I grabbed a couple and I got to work.

Recipe Review:

Taste: Not too sweet and the cinnamon and nutmeg adds a nice spiciness. The apples are slightly tart but still have their innate sweetness. The walnuts add a nice nuttiness to the pastry as well.
Texture: The apples add a nice bite but the addition of the walnuts is what makes it. They give the scone a lovely crunch.
Appearance: They are so cute to look at. There are little specks of cinnamon all over and some apples popping out the sides.
Level of difficulty: Extremely easy. Probably the easiest recipe I’ve posted on this blog.     


Scones 
yields approx. 10 scones 

ingredients:
2 3/4 cups all-purpose flour
1/3 cup sugar
1/2 teaspoon salt
1 tablespoon baking powder
1 teaspoon cinnamon
1/4 teaspoon nutmeg 
1 stick cold butter, cut into cubes 
2 large eggs 
1/4 cup applesauce 
1/4 cup heavy cream 
1/2 teaspoon vanilla extract 
2 apples, finely diced (about 1/4 to 1/2 inch thick) 
1/2 cup walnuts, toasted and finely chopped 
Heavy cream
Sanding sugar 
------------------------------------------------------------------------------------------
directions:

In a medium sized bowl, whisk together the flour, sugar, salt, baking powder, cinnamon and nutmeg. 

Work in the cubed butter evenly throughout the flour until the mixture is crumbly. The crumbs should be pea sized. 

In a measuring cup, mix the eggs, applesauce, heavy cream, vanilla, and apples. Add the liquid mixture into the butter and flour and mix until evenly incorporated. Lastly, mix in the chopped walnuts.

Scrape the dough onto a lightly floured surface and pat it out into a rectangle, about 3/4" thick. Cut the dough into roughly 10, 2 inch squares (or however large you want them to be). 

Place the scones onto the lined baking sheet and chill in the freezer for one hour. This yields the best texture and a higher rise. 

While the scones are chilling, preheat the oven to 400°F. Take the scones out of the freezer and lightly brush them with heavy cream and sprinkle with sanding sugar. Bake for 18-22 minutes or until they are golden brown. Let cool. 


These scones are best eaten slightly warm with some of your favorite jam. I ate mine with some raspberry jam and they were to die for. They are very buttery and flaky and the chunks of apple and walnut add a great texture. I think these scones will definitely be a great hit for my bakery one day! 

As always, Happy Baking! 

Wednesday, June 18, 2014

Cookies and Cream Cake

It's no secret that I am a fan of supermarket cakes. They're good, what can I say? My favorite by far is a good ol' fashioned cookies and cream cake. I love the light and fluffy Oreo cream layered in between rich and light chocolate cake. It's the perfect combination. And one day, I realized that I could certainly make my own version of this cake. So I did! 


To mimic the fluffy buttercream they use in the supermarkets, I made an Oreo swiss meringue. I found this to be the best choice because American buttercream always seems to be too sweet for my choice and it can be very dense. With a swiss meringue buttercream, the texture is always fluffy and smooth and it is just sweet enough. 


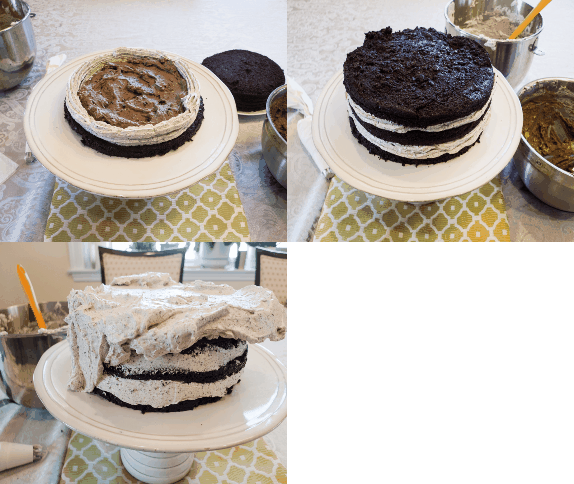
Having realized I did not make enough buttercream to both fill and ice the cake, I decide to fill the cake with a chocolate whipped cream instead. To do that, I just whipped up some cream and added melted chocolate and some crushed Oreos. I think that was a good mistake on my part. The whipped cream added an even lighter texture to the entire cake and really made it that much better! 

Here's what the entire cake consists of: Three chocolate cake layers, chocolate whipped buttercream with crushed Oreo filling, Oreo swiss meringue buttercream exterior, Oreo rim, chocolate ganache topping. It's heavenly, to say the least. 

Recipe Review:

Taste: Rich chocolate flavor from the cake and a mildly sweet swiss meringue buttercream

Texture: The cake is very moist and the buttercream is so smooth and fluffy, as well as the whipped cream. 
Appearance: Just look at the pictures ;)
Level of difficulty: Very easy, but time consuming with all the components. 


Chocolate cake:
yields 3, 8-inch cake layers 

ingredients:
2 1/4 cups all-purpose flour 
2 1/4 cups sugar
3/4 cocoa powder
2 1/4 teaspoons baking soda
2 1/4 teaspoons baking powder
2 1/4 teaspoons cornstarch 
1 teaspoon salt
1 cup buttermilk 
3/4 cup hot coffee
1/2 cup vegetable oil 
3 eggs, lightly beaten
2 1/2 teaspoons vanilla extract 
------------------------------------------------------------------------------------------
directions:


Preheat oven to 350°F. Spray and line 3, 8-inch cake pans.

In a medium bowl, sift together the flour, sugar, cocoa powder, baking soda, baking powder, cornstarch and salt. Set aside.  

In another bowl, mix together buttermilk, coffee, oil, eggs and vanilla. 

Add the wet ingredients into the dry ingredients and stir until just combined. Divide the batter evenly among 3, 8-inch cake pans. 

Bake the cakes for 20-25 minutes, rotating halfway. Cool completely. 


Oreo swiss meringue buttercream
yields approx. 3 1/2 cups

ingredients:
5 large egg whites
1 1/2 cup sugar
4 sticks unsalted butter, softened
10 Oreos, finely crushed 
------------------------------------------------------------------------------------------
directions:

Combine egg whites and sugar in a small bowl and place it over simmering water. Make sure the bowl does not touch the water. Heat mixture to 160°F while whisking constantly.

Transfer mixture into the bowl of a stand mixer, fitted with a whisk attachment and beat on medium high speed until mixture cools, doubles in volume and forms stiff peaks. This will take 8-10 minutes.

Slowly add in the butter, mixing to incorporate after each addition. Don't be afraid to add in big clumps at a time. At this point, the mixture may appear clumpy and almost curdled looking at first. Don't worry, this is to be expected. Just keep mixing and it will become even and smooth again. 

Once the mixture is completely smooth, add in the crushed Oreos and mix until combined. Set aside until ready to use. 


Chocolate Oreo Whipped Cream

ingredients:
1 1/2 cups cold heavy cream
2 tablespoons powdered sugar
6 0z. chocolate, melted and cooled 
6 Oreos, finely crushed
------------------------------------------------------------------------------------------
directions:

In the bowl of a stand mixture, fitted with a whisk attachment, beat the heavy cream and powdered sugar on high speed until the mixture forms stiff peaks. Add the melted chocolate and crushed Oreos and beat until just combined. 


Assembly:

Put a dollop of buttercream in the center of a cake board. Lay the first layer of cake on the bottom. Pipe a buttercream rim around the edge of the cake and spread half of the chocolate whipped cream within the rim, spread evenly. Lay another cake slice on top and pipe another rim and spread the remaining whipped cream on the second layer. Place the third layer on top. Spread the swiss meringue buttercream all over the cake until completely covered. Using an Ateco#827 tip, pipe 6 swirls around the border of the cake. Top each swirl with half of an Oreo cookie. If you wish, pour some lukewarm chocolate ganache in the center and give it some help to drip over the sides. 

Viola! You now have the most delicious cookies and cream cake ever. What is so fantastic about this cake is that even though it looks extremely sweet with the Oreos and buttercream and whipped cream, it really isn't at all. I would say it's appropriately an "adult" cake because it isn't so sweet. It's perfect for adult parties and kids' parties as well. Everyone will be satisfied with a big slice of this delicious cake. So go! go! go! What are you waiting for? 

As always, happy baking!